| Merge Images | Merge Barcodes | Merge PDFs | Store | |
Free Trial | |
How to Create Photo Name Badges or IDs using OnMerge Images
This how-to tutorial will show you how to create mail-merged name badges or tags that include a persons photo. This same approach works for printing name badges or name tags for conferences, events, and even high school and college reunions. It's also great for creating ID cards and membership cards that must have people's photos on them.
You can start with data in Excel spreadsheets or any other database format that Word understands. The key is that Excel and other database systems don't have the formatting power to make good-looking name tags, so we use Word's mail merge feature to format the name tags or badges.
Note: this how-to assumes the OnMerge Images add-in is installed in your copy of Word. You can get a free trial copy here.
The badges will be printed on Avery 5392 name badge
blanks, but you can easily change the forms you're using. The merged result will look like this, though you'll be able to change the format once you understand the basics:
Best of all, well show you a system for laying out professional-looking name badges or ID cards that mail-merge perfectly and neatly every time!
To do this merge, you will need:
Setting up the Master Badge Template We will be using a sample database for this sample, but you can use your own database, spreadsheet, or your Outlook Contact List.
We have included a pre-built template for the above name badges so you can easily follow along these steps. Click here to download the sample files.
Already know how to set up a merge?
Click here to skip to badge formatting instructions. Setting up the Merge ProcessStart with a blank Word document. Select Mailings + Start Mail Merge + Step by Step Mail Merge Wizard to bring up the Mail Merge wizard on the right side of your screen. The wizard will guide you through six steps to complete your merge. · Wizard Step 1 of 6, Select document type: this example creates labels, so select Labels and click Next at the right, bottom of the screen. These arent sticky labels; Labels is just Microsofts term for any layout where several items (like badges) are printed N-up (i.e. 2-up, 3-up, etc.) on one large page. · Wizard Step 2 of 6, Select starting document: o If you were typing in a document from scratch, you would select Use the current document. If you already have a pre-existing letter, select Start from template or Start from existing document and select a document below. o
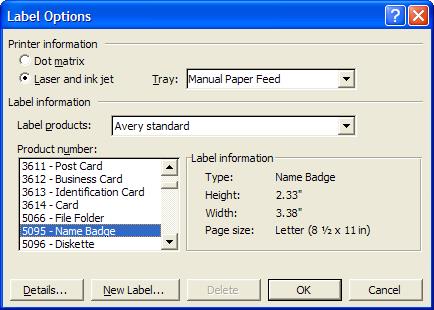
Click Label Option and select Avery 5392
or whichever blank labels you have o Click Next. · Wizard Step 3 of 6; Select recipients. Here, we will use a pre-prepared Access database. o Select Use an existing list, press Browse, navigate to your database and click OK. o Click Next back in the Mail Merge Wizard. · Wizard Step 4 of 6, Arrange your labels: Detailed Label Formatting Instructionso We strongly recommend that you always use a Word table as shown below to lay out all small layouts like this. Once you understand it, this approach gives much better control over the formatting and merging than any other method we know of. o Words badge label layout is itself a table with 6 cells, and well need to get rid of the internal margins in those cells. Make sure the cursor is in the very top, left corner of the top, left label and select Layout + Properties + Table tab + Options, set all the default cell margins to 0.0, press OK, OK. o
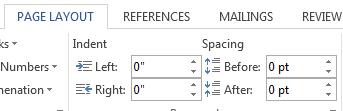
Dont miss the following unobvious tricks: making sure the cursor
is still in the same place as above, click Page Layout and set all
of Indent Left, Indent Right, Spacing Before to 0. o Insert a 3 x 2 table in the top, left label: make sure the cursor is still in the top, left label, then Insert + Table + Insert Table, 2 columns, 3 rows, OK. o Place the cursor in the top, left cell of the new table, then hold down Shift and click (i.e. Shift-click) in the top, right cell. The entire table row will be selected. Select Layout + Properties (NOT Page Layout). §
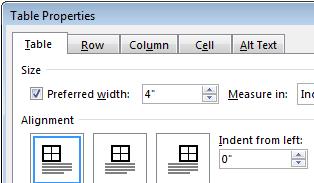
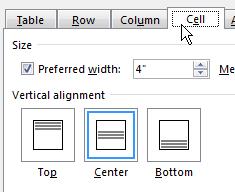
First, set the properties for the whole table. Make sure the Table
tab is the dialog box is active, check the Preferred width box, enter 4.0
(the width of each badge) in the box to the right. Set Indent from left
to 0. To get rid of borders, press Borders and Shading, None, OK. §
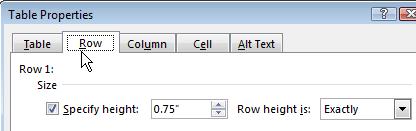
To set the properties of the first row, click the Row tab,
check the Specify height box, enter 0.75 in the box to the right,
select Row height is: Exactly. Click the Cell tab, set Vertical
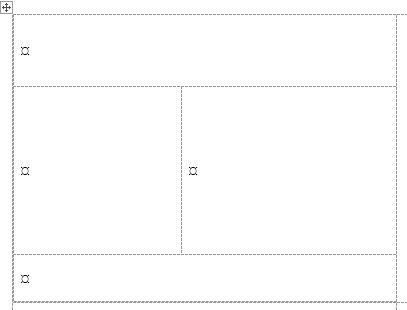
alignment to Center. § Click the Row tab, click the Next Row button to access the 2nd rows properties, repeat the above but use 1.75 as the height § Click the Row tab, click the Next Row button again to select the 3rd rows properties, repeat the above but use 0.5 as the height § Press OK. o If you cannot see dotted-line outlines of the table cells, Layout + View Gridlines o To make the top row into a single wide cell, place the cursor in the top, left cell of the table, then hold down Shift and click (i.e. Shift-click) in the top, right cell. The entire table row will be selected. Right-click on the row and select Merge Cells from the drop-down list. The entire row will now be a single cell. o To make the bottom row into a single wide cell, repeat the above step in the bottom (3rd) row of the table. o
To make the center, left cell slightly narrower than the right
one, place the cursor in the left, center cell and select Layout + Properties,
the Cell tab; set the Preferred width to 1.6, press OK.
The table will now look like this: o Well now create our events simulated logo. Place the cursor in the bottom row, select Design + Shading (the Design ribbon on the far right; there are two of them), pick a dark color. Select Home + <Font color icon>, pick White. Type the events name, then select the text and pick a suitable large font and type size (e.g. Arial Narrow, 28 pt.), click the <Center text> icon. o
Well now place the persons name at the top of the badge in
large type. Some people have long names, so its important to use a narrow
or condensed font such as Arial Narrow to avoid overflow. Place the
cursor in the top row. Click Home, select Arial Narrow, 28
points, Bold. Click the <Center text> icon. o Place the cursor in the right column of the center row and add appropriate personal information (organization, job title, etc.) using Mailings + Insert Merge Field. Format as appropriate (e.g. Arial Narrow 18 pt). o Now for the Photo. Place the cursor in the left column of the center row and click Mailings + OnMerge Images. In the OnMerge popup dialog: §
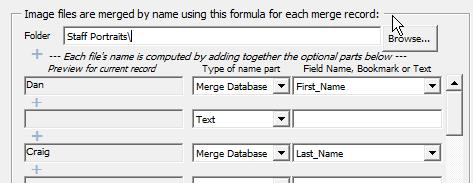
In this example, we have the photos in a folder named Staff
Portraits, so press the Browse button and navigate photo folder, press OK.
The photos are named <First> + blank + <Last>.JPG
so well enter a Merge Database lookup on the first name part row
for the First_Name, the Text value <spacebar> in the second row,
and a Merge Database lookup of Last_Name on the third row. A photo will
pop up in the preview area since OnMerge Images is able to guess that the
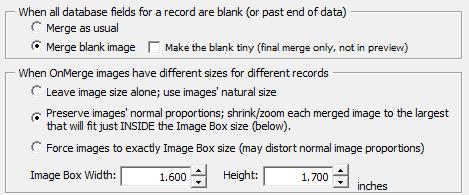
filename ends in .JPG § Select the Merge Options tab, set Image Box Width to 1.6 and Height to 1.7. §
To prevent generating error messages in the otherwise-blank slots
at the end of the last printed sheet, make sure that the Merge Options
tab is still selected, click Merge blank image under When all
database fields
§ Click OK. o Click Update all labels in the Mailings ribbon or in the Mail Merge Wizard area to copy the information the remaining badges. Notice that Word inserts <<Next Record>> in each duplicate badge, which will alter the on-screen formatting. Please ignore this as it will not affect the final result. What is <<Next Record>>? This is a non-printing marker which Word automatically puts into all but the first record of a multi-record page. Normally, the Mail Merge process will advance to the next data source record only after merging the entire template with a data source record, but <<Next Record>> causes the mail merge processing to immediately advance to the next data source record. o Click Next back in the Mail Merge Wizard. · Wizard Step 5 of 6, Preview your labels: you may use the << and >> buttons in the mail merge wizard to preview your finished labels. Click Next. · Wizard Step 6 of 6, Complete the merge: Clicking Print will merge the labels with images directly to your printer. Clicking Edit individual labels will create a new Word document that contains all the badges in the completed mail merge; this option is useful for final verification before printing.
There you have it! You started with Excel or other data and some photos, and ended up with the ability to print hundreds or thousands of great-looking name badges and name tags with very little effort. Data or layout changes? No problem -- just make the changes in Excel or the Word template and let Word do all the work of reprinting new badges and tags. |


| Privacy Policy | Support | Buy | ||
| Terms & Conditions | Contact Us | Download Free Trial | ||
| Copyright © 2005 - 2021 Soft Horizons All trademarks are property of respective owners. | ||||